How to Install Windows on Your Mac using Boot Camp


Want to know how to install Windows Xp, Windows Vista or Windows 7 on your Mac OS X? Then you are in right place.In this article, I will teach you installing windows in Mac using Boot camp assistant with screenshots.You can also use Parallels Desktop to run Windows operating system on Mac virtually.
Step-by-step Tutorial to Install Windows Using Boot Camp

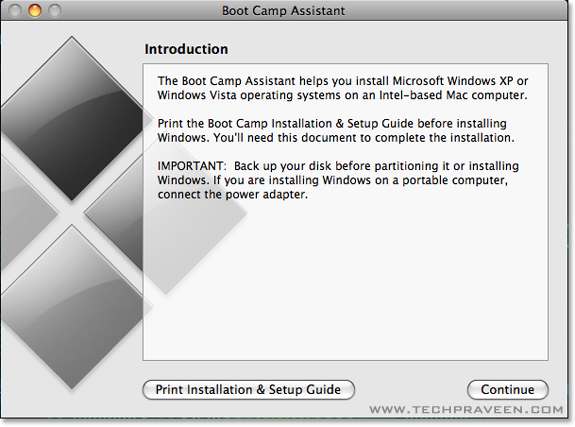
1. Goto Applications –> Utilities and open Boot Camp Assistant.
2. Click Continue on the initial Introduction screen.

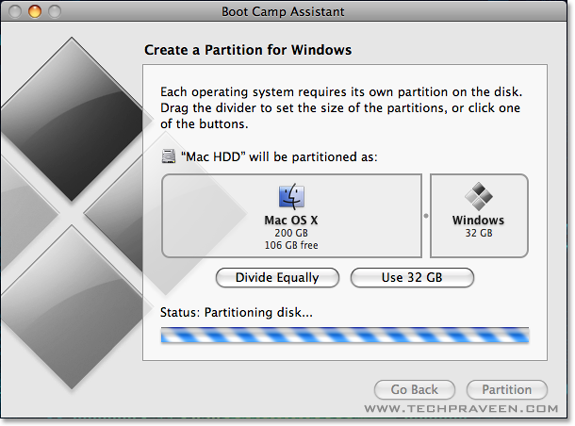
3. Set windows partition size by dragging the divider.And click Partition button.


4. Once completed you’ll notice a new BOOTCAMP drive on your desktop.
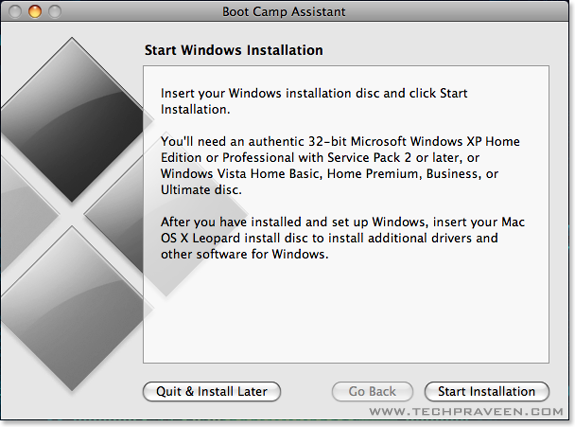
5. Now insert your Windows Xp or Vista or 7 DVD and click the Start Installation button.


Note:
In this tutorial I have used Windows Xp.
6. Your Mac will restart, and Windows Xp will boot. You’ll be prompted with a window asking you which partition you want to install Windows on. Select the one with BOOTCAMP in the Name column. Selecting anything else may wipe out OS X or cause serious problems. Just format BOOTCAMP partition with NTFS.
7. As usual the normal windows xp insallation process will go.
8. Once the installation has completed and your Mac has restarted again, you’ll be able to use Windows Os.
9. Now insert your Mac OS X Tiger (or Snow Leopard) DVD. When prompted, select Run setup.exe.

Note:

If you’re using Snow Leopard and a message pops up saying “Remote Install Mac OS X”, close that window and eject the CD. Put the CD in again and this time select “Open folder to view files”, navigate to the Bootcamp folder, and run setup.exe.
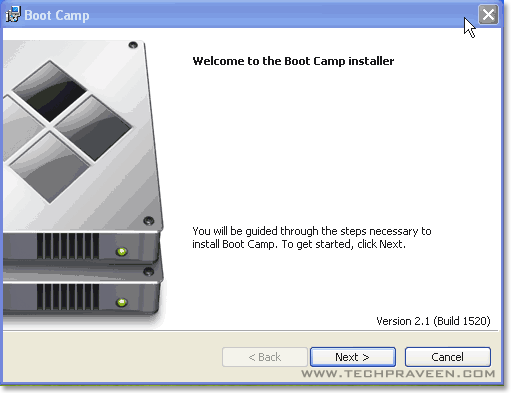
10. The Boot Camp installer will launch. Click Next to begin.


11. Select I accept the terms in the license agreement and then click Next.
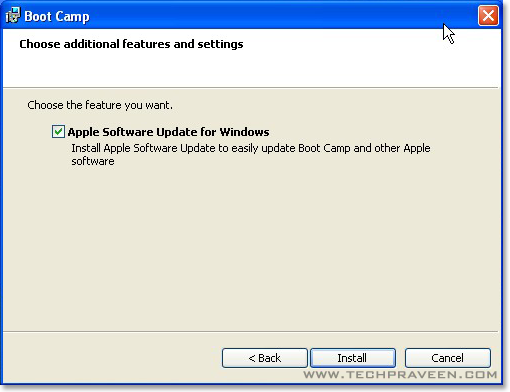
12. Choose Apple Software Update for Windows, and click Install.

14. Once completed click Finish.
15. Again you’ll be prompted to reboot. Remove your OS X DVD from the drive, and click Yes to restart.
16. That’s it, you’re done!
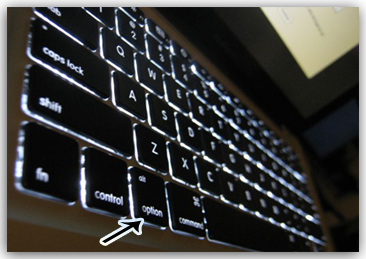
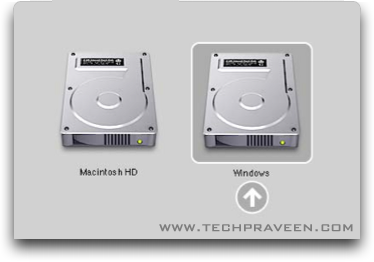
17. When your Mac boots, hold down the Option key to select which Operating System you want to boot into.
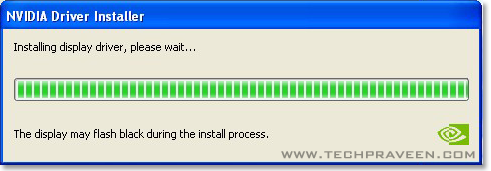
13. The Boot Camp installer will install all the required drivers.


14. Once completed click Finish.
15. Again you’ll be prompted to reboot. Remove your OS X DVD from the drive, and click Yes to restart.
16. That’s it, you’re done!
17. When your Mac boots, hold down the Option key to select which Operating System you want to boot into.


How to Sort Unread Emails in Yahoo Mail?

Filter Unread Emails in Yahoo Mail Classic

Open the inbox, and then click unread as shown in the below screenshot. That’s it check and delete unwanted mails. Filter Unread Emails in Yahoo Mail Beta

Open Inbox and click on square shaped purple icon. It will display unread mail list.


http://www.techpraveen.com/wp-content/uploads/2011/05/BitDefender-USB-Immunizer-Protect-USB-from-Autorun-Malwares.png


Bitdefender USB Immunizer is a freeware utility to immunize USB storage devices or SD cards against infections with autorun-based malware.Autorun based viruses and malwares are one of the most common issues faced by USB pen drives when using on public computers.Protect your USB from those infection with USB Immunizer.This utilty is a very good alternative for Panda Security’s USB Vaccine.

This small utility is divided in two sections.

1. The Immunize option allows you to immunize your USB storage device or SD card against infections with autorun-based malware. Even if your storage device has been plugged into an infected computer, the piece of malware will be unable to create its autorun.inf file, thus annihilating any chance of auto-launching itself.
2. The Immunize Computer slider allows you to toggle the autorun feature On or Off for any removable media (except for CD/DVD-ROM devices). If you accidentally plug in an infected USB drive that has not been immunized, the computer will not auto-execute the piece of malware located on the USB storage device.

Hard Drive not Recognized/ Found/ Detected/ Accessible

If you install a new hard drive and install an Operating System on it and it suddenly acts like it is not there, it may be a loose connection.

If a bootable CD, such a s Knoppix, is not able to read your hard drive, it can have several causes. The list of possibilities below can also be used for troubleshooting hard drives, floppy drives, and CD/DVD drives.

CAUTION: Make sure the power is off and that the PC is disconnected from power. Also be sure to avoid static electricity, or you will need a new PC. Do not force any thing. All parts should easily fit together if they are properly aligned. Sometimes you may have to push or pull harder than you think. Just be careful to make sure any levers or buttons that hold it in place are not overlooked.

* Least likely is that a new hard drive has failed. Try the other options before assuming it is the new hard drive. If all of the below do not work, and it is a new hard drive, contact the manufacturer. New hard drives should include very good instructions for installation and troubleshooting. When in doubt read the instructions.

* Open the case and make sure that all the connections are correct.

* Unplug the power supply connection, make sure there are no bent pins, and plug it in securely.

* Repeat the procedure with the connection to the motherboard, make sure no pins are bent.

* If you have multiple drives, try hooking up just one drive to make sure you can read it.

* Make sure that the power supply, and other components are working correctly. It is possible that another component of the PC has failed.

* If you have another PC available, try connecting it to the other PC. This could point to failure of the power and/or motherboard cables in the original PC.

* If none of the above works, call in professional help. You can also beg a friend or family member to help. If you cannot pay a friend or family member, a good meal, is a nice way to get them to rescue you again.

Mac Tips and Tricks – Dashboard Widget


Contents of Mac Tips and Tricks Widget

1. Using Finder
The Finder lets you organize, view, and access practically everything on your Mac, including applications, files, folders, discs, SD memory cards,…

2. Using Preview
Preview is a simple, elegant application for viewing and working with PDF documents.
You can also view and edit images. Crop, rotate, resize, and save images in a range of formats.

3. Using iLife
Organize photos by Faces and Places. Create photo books. Make a movie. Even learn to play music. All with iLife. All part of every new Mac.

4. Using iPhoto
Organize your photos. Crop, retouch, and remove red-eye. Then share on the web with MobileMe, Facebook, and Flickr, or make a photo book.

5. Using iMovie
Make movies on your Mac. Take your time editing or use themes to finish a movie in minutes. Then share on the web with YouTube or MobileMe.

6. Using GarageBand
With GarageBand on your Mac, you can learn to play guitar and piano, get lessons from famous musicians, and record and mix your own songs.

7. Using iWeb
Use iWeb to design websites and blogs featuring your photos, movies, and more. iWeb even notifies Facebook when you post something new to your site.

8. Using iDVD
With iDVD on a Mac, you can create and burn professional-looking DVDs to share your movies and photo slideshows.

9. Using iChat
If you’re looking for a more personal way to stay in touch, iChat enables you to see and hear your friends, family, and coworkers no matter how…

10. Using iCal
If you need help managing your life and time more wisely, iCal provides all the tools you need to keep track of schedules, appointments,…

11. Using Mail
Learn what you can do if you are having issues sending Mail messages after updating to Mac OS X v10.6 Snow Leopard.

12. Using Safari
Experience the web with the fast, easy-to-use web browser. With its simple, elegant interface and support for the latest Internet standards, Safari gets out of your way and lets you enjoy the web.
Safari 4 is a high performance, modern Internet web browser for Mac OS X and Windows. It supports the latest standards in HTML 5 and CSS 3,…

13. Using Address Book
Whether you’ve got all your contacts stored neatly in an electronic device or are still hanging on to your tattered address book, personal…

14. Using Exposé
Expose in Mac OS X lets you instantly view all open windows in stunning style with a single keystroke.

15. Using the Dock
Learn about The Dock, Dock Exposé, Dock menus, and Stacks in Mac OS X v10.6 and later.

17. Using Dashboard
Instantly get info with amazing new widgets. Play a game. Read the news. Search the web.

18. Customizing Your Mac
Every Mac comes standard with assistive technologies that help people with disabilities enjoy the power and simplicity of the Mac.

19. Keyboard Shortcuts
Tip of the Week. Create Your Own Keyboard Shortcuts. Keyboard shortcuts are such huge timesavers, but sadly, not all Finder commands have them…Here is a list of Mac Os X Keyboard shortcuts

Doing business on your cell phone


As mobile phone especially smart phone is getting more and more popular around the world, the online service could not longer afford to neglect this profitable field.

One of the largest online trading platform, Ebay announced its mobile version website (http://pages.ebay.com/mobile/). Now you can view your current auctions, receive alerts while you are outbid, and up your bids all by cell phone. This is very convenient when you are out without your laptop, so you can do business everywhere, any time.
In the meantime, Paypal, one of the leading online payment solution provider, got its mobile version up (https://www.paypal.com/mobile). With this mobile Paypal, you can view your balance, send and receive funds via your mobile phone. You can manage your account easily and be notified of your financial status.

Ebay acquired Paypal years ago and used it as its only payment method. Since they all released mobile version, now you can really do business anywhere, anytime.

Best “New” Web Browsers


Many people swear by either Google Chrome or Mozilla Firefox, but there are a myriad of other new web browsers that are definitely worth a look. Truly, neither Chrome nor Firefox are perfect. There are some features we would like to see built into Firefox (that meanwhile, we’ll just have to satisfy with addons), and others that we still wonder why Chrome hasn’t bothered to include such as RSS feed detection (which meanwhile can also be satisfied with an add-on).

A lot of the following browsers ship with addons that you would otherwise have to obtain yourself, so they may make for a fresh breath of air.

How To Download MP3s & Control Grooveshark From Firefox

For those of us with access to Grooveshark, life is pretty good. We can listen to quite a bit of amazing music for free, simply by picking a playlist and kicking back to enjoy the tunes. Sometimes, you could be tempted to think things on the online music scene couldn’t get any better. But then someone comes along and creates a little tool which completely makes your day just by adding a little bit more awesome to the mix

Free Mobile Internet Hack

This secret mobile phone trick comes from a pair of video bloggers at TheFixed.org. In their premier episode, they showed viewers how to convert their free mobile minutes which most network plans will offer, into web data allowances. Basically, it involves setting up your own proxy using a website they specify in the guide and then changing some WAP settings on your phone.

Turn your Bluetooth cell phone into a remote control


If you have a Bluetooth mobile phone and a Bluetooth enabled desktop or laptop (now many laptops come with Bluetooth feature, if not, you can always buy a Bluetooth USB Dongle), you can pair them and use your cell phone as a remote control, browse files, play music and PowerPoint presentations on your computer.

To do this, you have to pair your mobile phone with your computer first, you can find a tutorial here as to how to pair your mobile phone.

After Bluetoth pairing up, you need to download a program called Bluetooth remote control, including a client to be installed on your computer and a small app on your mobile phone to control your laptop. You can find a detailed user guide on this.

Nokia cell phones top secret service codes


Below are some top secret service codes for your Nokia cell phone:

*#06# – Shows your International Mobile Equipment Identity (IMEI) number.
*#92702689# (*#WAR0ANTY#) – Shows warranty information. to exit this mode you have to switch your phone off then on again.
*#7370925538# (*#RES0WALLET#) – Resets wallet code with wallet contents.
*#2820# (*#BTA0#) – Shows BlueTooth Address for cell phones with Bluetooth.
*#62209526# (*#MAC0WLAN#) – Shows WLAN MAC for cell phones with Wireless LAN (WiFi).
*#7780# (*#RST0#) – Normal reset, restore your cell phone to factory settings.
*#7370# (*#RES0#) – Deep reset, restore cell phone to factory settings and format all user data.
*#0000# – Shows your cell phone’s firmware version.
*3370# (*EFR0#) – Activates Enhanced Full Rate codec (EFR) (your cell phone uses the best sound quality but talk time is reduced by approx. 5%).
#3370# (#EFR0#) – Deactivate Enhanced Full Rate codec (EFR).
*4720# (*HRA0#) – Activate Half Rate codec (your cell phone uses a lower quality sound but you should gain approx. 30% more talk time).
#4720# (#HRA0#) – Deactivate the Half Rate codec.
*#67705646# (*#OPR0LOGO#) – Removes operator logo on some phones.

LG secret codes


LG cell phones are a little different from other mobile phones, they do not have the same secret codes for all mobile phones, but below codes work on most LG cell phones, you may wanna give it a go.

Test mode: 2945#*#
Secret menu: 2945*#01*#
IMEI number: *#06#
IMEI and SW (LG 510): *#07#
OS version (LG B1200): *8375#
Recount cheksum (LG B1200): *6861#
Factory settings (B1200): #PWR 668
Simlock menu (LG B1200): 1945#*5101#
Simlock menu (LG 510W, 5200): 2945#*5101#
Simlock menu (LG 7020, 7010): 2945#*70001#
Simlock menu (LG 500, 600): 2947#*

Special codes for LG-U81XX series cell phone

Code to read phone version :
- Phone without SIM
- Enter 277634#*# or 47328545454#
- Select ‘SW Ver.info’

Code to reset phone :
- Phone without SIM
- Enter 277634#*# or 47328545454#
- Select ‘Factory Reset’
Code to enter unlock menu :
- Phone with SIM
- Enter 2945#*88110#
Test Menu 8330 : 637664#*#
Test Menu 8180 V10a: 49857465454#
Test Menu 8180 V11a: 492662464663#
Test Menu 8130-8138: 47328545454#
Test Menu 8110-8120: 277634#*#

Samsung P1000 Galaxy Tab VS Apple Ipad

Key features


190.09 x 120.45 x 11.98mm, 380g
Quad-band GSM and tri-band 3G support, 7.2 Mbps HSDPA and 5.76 Mbps HSUPA support
Full GSM phone calling functionality
7″ 16M-color TFT LCD capacitive touchscreen of WSVGA (600 x 1024) pixel resolution,
Android OS v2.2 with TouchWiz 3.0 UI customization
1GHz Cortex A8 Hummingbird CPU
PowerVR SGX540 graphics accelerator
512 MB of RAM
3.2 MP autofocus camera with smile detection and geo-tagging
D1 (720 x 480 pixels) video recording at 30fps
Wi-Fi 802.11b/g/n support
GPS with A-GPS connectivity; Digital compass
16GB internal storage, microSD slot
DivX and XviD video codec support, Full HD video playback
HD video out (with a proprietary dock)
Accelerometer, ambient-light and gyro sensor
Standard 3.5 mm audio jack
30-pin connector and stereo Bluetooth v3.0
Office document editor
Secondary video-call camera
Swype predictive text input
Adobe Flash Player 10.1 support
Stereo speakers
4000 mAh Li-Ion battery
Great audio quality
Main disadvantages
Poor viewing angles
Picture ghosting due to slow LCD response
Some apps incompatible with the new resolution
Gallery displays downsized images only
Quiet loudspeaker
No FM radio
No USB host support
Samsung Galaxy P1000 Tab over Apple iPad
Lighter and smaller, easier on the pocket
Telephony (including 3G video calls)
3.2 MP camera with D1 video recording @ 30 fps and LED flash
Android OS v2.2 Froyo
Proper multitasking (though the iPad is getting that too in a couple of months)
microSD card slot for memory expansion
Uses regular size SIM card
16:9 widescreen display
Adobe Flash player 10.1
DivX/XviD 1080p video playback
Bluetooth 3.0
Apple iPad over Samsung P1000 Galaxy Tab
Larger and better screen
Metal body
iOS 3.1.3 with more than 25 000 apps tailor-made for it
Larger internal storage (iPad 64GB)
Better battery life
YouTube app streams higher-quality footage

More iPhone tricks and tips

start your iPhone

Press and hold the Home button and the Sleep button to restart your iphone. Moment, a white light will flash, the screen will shut off while keep holding until the screen turns back on.

To take a screenshot

Hold the home button then click the Sleep/Wake button. The screen will flash white and the screenshot will be appears in your Camera Roll.

Create web clips

To add a website to your Home screen, visit the page in Safari and tap the plus sign at the bottom of the screen. Now tap “Add to Home screen.”

Use the compass with maps

Press the location button in maps twice to use the built-in compass to orient the map based on the direction you are facing.

Locate your lost iPhone

If your iPhone lost, Find My iPhone can help you locate it on a map and protect its date. Display a message on its screen, remotely set a passcode lock, or initiate a remote wipe to delete your date.

Save image from web page

To save any image from the web to your camera roll, simply press and hold the image. A menu will appear asking “Save image” or “Cancel” Once the image in your camera roll, you can set it as your wallpaper

Press to zoom the camera

Press the screen to bring up the zoom control, then the slider to zoom in and out up to 5x.

Press to focus the camera

While shooting video or photos, press the screen where you want to focus. iPhone will also adjust the exposure and white balance automatically.

Scrub through audio and video

When you’re watching a video or listening to music or a podcast, the scrubber bar lets you skip to any point along the timeline. You can adjust the scrub rate from high-speed to fine scrubbing by sliding your finger down as you drag the playhead along the scrubber bar.

Create an iPod playlist

In the iPod app, tap Playlists, then tap Add Playlist and give it a name.Now tap any song or video to add it to the playlist. You can add individual songs, entire albums or all songs by an artist.

More keyboard and input tricks

Tap the space bar twice, and iPhone adds a period and capitalizes the next word.

To enter a number or symbol quickly, touch and hold 123, the select the key you want. lifting your finger returns you to the alphabet keyboard.

Hold a letter to reveal a list of special characters.

Hold down the”.com” key for”.net, .edu, .org” keys. Note: Slide your finger from .com to .net/.edu/.org, rather than lifting and pressing.

Find the text you want to edit in a note, email, web page, or other app. You can select a word by double-tapping it, and select more or less text by dragging the grad points. Then press to cut, copy, or paste. To undo an edit, shake iPhone, the press the Undo button.

Email and Text management

In Email, you can delete or move messages in batches. From your inbox, press Edit, check off the desired emails and then choose Delete or Move.

Delete email messages and text conversations without opening them, simply” cross it out” by swiping your finger across the email or the text conversations, then press Delete.

Print wirelessly from your iPhone

Airprint makes it easy to print email and web pages right from your iphone to your airprint-enabled printer. To print an email, just press the Reply icon and select Print. To print a web page, press the Action icon and select Print. You can also print photos, documents, and more.

For more iPhone tricks, tips and instructions press the Bookmarks icon in Safari, then select iPhone User Guide.

How to Remove Websites from Tabs in Chrome Homepage

Recently, when we covered 5 tab extensions to fancify chrome some readers mailed me, asking how to open blank tabs for privacy concerns? That is, they wanted to remove or hide most visited or recently closed websites from chrome’s new tab page.
Normally, when we open new tab in Google chrome, home page speed dial similar to opera displays most visited sites. Under normal circumstances, this is pretty useful as it provides facility to go to our favorite site with a single click. But sometimes, this is not at all favourable, especially when you want to hide your activities. At office or in home there are some situations when you don’t want to publicly display your recent visits for privacy reasons.

Possible solutions for this problem include - using incognito mode or removing website thumbnail from list. But this isn’t permanent solution for this recurring problem. Let’s discuss 2 potential solutions for this:


Temporary Hide Frequently Top Visited Web Pages

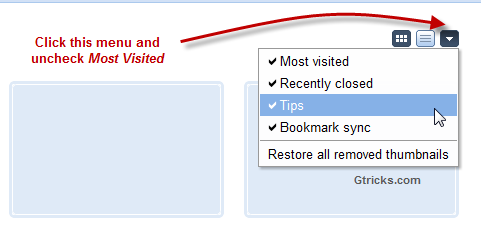
This one is simple, infact inbuilt in Chrome so you don’t have to download anything. All you need to do is click on Change Page Layout button and uncheck most visited and recently closed sites. Check out below image for instructions.

Download Desktop Client or Application for Facebook

How wonderful it would be if you could have separate client/application for facebook on your computer. So, without every time opening the browser then logging into facebook, you can simply open a application and directly start using it.

Fishbowl is such software which lets you do all sort of stuff on facebook from your desktop. Why use a desktop tool instead of opening Facebook in browser? Because, they provide more functionality and it is more convenient to use. With fishbowl, you can simply drag and drop pictures to upload them in albums or change colour if you don’t like facebook blue interface and much more.

Download this desktop client from here.
System Requirements of Fishbowl


Operating system: Windows XP with Service Pack 2 (32-bit edition only), Windows Vista (32-bit or 64-bit editions), Windows 7 (32-bit or 64-bit editions), or Windows Server 2008.
Processor: 1 GHz or higher for Windows 7 or Windows Vista; 800 MHz or higher for Windows XP.
Memory: 1 GB of RAM for Windows 7 or Windows Vista; 512 MB for Windows XP.
Internet connection: Internet functionality requires dial-up or broadband Internet access (provided separately). Local or long-distance charges may apply.
Graphics or video card: A video card that supports DirectX 9.0 or higher, and Shader Model 2.0 or higher.

Easily manage Gmail Contacts and Attachments with MailBrowser Plugin

MailBrowser is a Gmail plug-in which is ideal for people dealing regularly with attachments and unknown contacts. This plugin works with both Gmail and Google Apps account. You can also configure multiple accounts with this browser plugin. Unlike other plugins or addons available with Gmail, MailBrowser loads into your browser sidebar. And since it remains separate from your gmail inbox, it is non-intrusive and very convenient plugin to use. MailBrowser is available for both Firefox and Internet explorer and you can download it from here.

Contact Features
With MailBrowser, you can get complete list of people you have ever contacted and you can easily save them to Google contacts with a click of button.
It also makes searching and sorting of contacts simpler and better. Since it makes a copy of your contacts on local hard-disk, search is very fast.
You can add tags to contacts for categorizing them. In addition to this, you can “star” important contacts and create Google Calendar events for a contact right from the sidebar.


Attachment Features
MailBrowser is a powerhouse when it comes to attachments. All the attachments are downloaded to your hard disk and thus searching, previewing and opening attachments is superfast.
Gmail lacks searching inside attachments, but with MailBrowser, you can use desktop search utility to search text inside any attachment.
Moreover, MailBrowser provides thumbnail preview, which makes searching and sorting super easy.

MailBrowser is made by an Indian Company- Webyog and as per them that it’s the perfect plugin if you don’t want to use Outlook with Gmail. You can find more official features here. Below video explains how MailBrowser will work with your contacts and attachments.

You can download MailBrowser from here.

Note: Since MailBrowser downloads all your contacts and attachments into local machine, it might take substantial amount of time for the first run.

3 Methods to Transfer Emails Between Two Gmail Account's


Want to transfer your mails from one Gmail account to another? Why? Because it could be helpful in certain situations like –

#1. Your email address is unprofessional and now you want to change to some other neat address.

#2. You are receiving huge amount of junk and now want to use new one. Therefore, you want to migrate emails from old Gmail account to new one.

#3. You got multiple active Gmail accounts and now you want to use only one Gmail account. So in this condition, you want to transfer old emails from multiple places and paste them into newly-active Gmail account.

We can approach this problem with 3 different ways. Mail transferring methods depends on how you want it and how much you want it? It could be as simple as setting a filter or as complex as downloading all mails to computer and uploading them to new mailbox.

Let’s look at 3 possible solutions to transfer emails between two Gmail accounts:

1. Set up a Filter for Forwarding Old and New Mails

This is one of the simplest method that I have found. All you need to do is set up a filter that forwards all incoming mails to your new Gmail account and then checking the “Also apply filter to x conversations below” checkbox. This is a very simple method but its effectiveness is not guaranteed though, it is working for me.

However, there are two disadvantages of this method. One, you need to keep alive your old account. Second, mails send to a list that you are a part are not forwarded to your new account so you need to come back to your old account periodically.

Note: If you don’t want your old messages then you can choose auto-forwarding from settings, which is lot more easy and a sure-shot way to get mails from old accounts.

2. Leverage POP for Downloading and Transferring Mails

This method is strongly recommended for comprehensive transferring. You can leverage Gmail’s fantastic POP ability to download mails from one account to another account. Just follow these steps –

In Your Old Account

1. Go to Forwarding and POP/IMAP option in Gmail Settings.
2. Select the first option Enable POP for all mail (even mail that’s already been downloaded) in the POP Download section.
3. Save your settings.

In the New Account

1. Goto the Accounts and Import option in Gmail Settings.
2. Click on Add POP3 email account button from the Check mail using POP3 section.
3. Fill up your old account information in the pop-up. Choose all defaults fields except POP server to pop.gmail.com.
4. Save your settings. You are done.
In this method, mails will not be transferred at once and it may take few hours if your inbox is gigantic. Unfortunately Gmail chat history will not be transferred.

This is the best method I have seen for complete migration. It is often referred as Mail Fetcher. GMail provides complete support for this here.

3. Migrate Completely – Even Moving Your Labels with You

One common problem of migration is that all mail labels are lost. Even though, you have transferred your accounts successfully, you will end up in unorganized mailbox.

Guys at lifehacker has taken this seriously and they have come up with a lengthy but very effective process to migrate mailbox completely here. Basically, they have removed all multi-label mails, applied them a single label and then used desktop client to drag-n-drop mails between various folders. You can find complete tutorial here.

Any of these 3 methods can be used for moving emails from different Gmail accounts to single consolidated one. Choose the one that best suites your needs.

Make ‘Reply to All’. as Default Option in Gmail

Gmail by default shows reply option in the rightmost dropdown for any mail. However, for a section of people, who use Gmail for business purpose it is very inconvenient to select ‘reply to all‘ each time from the dropdown for keeping everyone in the loop.

Note: Just like outlook Ctrl + Shift + r shortcut key for replying to all, you can use single shortcut key ‘a’. [More Gmail shortcuts]


A personal reply is always the preferable way for communication over emails. Reply to All is only suited in few cases where the recipients are aware of each other and belong to same category. Moreover, you could be included in BCC (Blank Carbon Copy) and a reply to all could potentially land you in trouble. It is also an annoyance for some who keep on receiving bulk email conversation threads. Therefore, everyone should use this feature with extra caution. Being said this, let’s look how to make reply to all as default button in Gmail.

This can easily be done with the use of Gmail Labs Feature. Follow these steps for changing default button action –

1) Go to Gmail Settings found at rightmost top of page.

2) Open Labs from Settings Page.

3) Press Ctrl+F for find the ‘reply to all’ feature.

4) Enable it and Save your settings.


That’s all. Now when you compose new mails, reply will be replaced by reply to all. You can find old single reply from the drop down. To bring back the old behaviour, you will need to deactivate this lab feature.

Google Magic Trick to surprise Your Friends

This is a simple Magic Trick with Google that can be easily performed to surprise you friends and win laurels. No prior experience or preparation required to carry out this magic trick.


The trick is to disappear the two O’s from the Google logo. For this, first navigate to this page, by Dark Arts Media. Do not tell your friends that you are going to perform a magic else they would be extra careful and will notice the URL address.


Be casual, open this page, and then do some gestures by one hand covering the Google logo, uttering aabra-ka-dabra and click anywhere on page by another hand. Remove your hand from the logo and your friend will be surprised to see that the two middle O’s of Google are missing. Repeat the same steps to bring back the missing alphabets and enjoy this funny effect with your friend.

The catch is at the special page, which animates by itself when you click on it. For the first time when you click, the alphabets will disappear. When you click again, the alphabets will reappear after 5 seconds. Moreover, if you click third time, you would be forwarded to original Google home page.

How to Enable God Mode in Windows 7

Windows 7 is the smarter and faster operating system developed by Microsoft. There are many setting options available in the Control Panel of Windows 7, but sometimes it is difficult to find the perfect setting option. If you have to change a lot of settings in your Windows 7, then it will take a lot of time in Control Panel, so here I am sharing a trick in which you can do all the settings of Windows 7 like you do in the Control Panel directly from a single window. The trick is very easy, you just have to create a folder and that folder will work as Settings pane. People call this trick as Windows 7 God Mode.


The trick begins here:
Create a new folder and name it anything.
Now, rename the folder by pressing F2 or Right-click>>Rename and give it this new name: Settings.{ED7BA470-8E54-465E-825C-99712043E01C}
After renaming the folder, its icon will be changed. Double click the folder to open it.

Now, you will see a screen like below. Here, you can change all the settings of your Windows 7 OS.


Clone a CD?

Cloning a CD is a good option to backup the entire things on the CD. When you copy files from the CD, it does not copy the CD settings, like its labels and other things. But, cloning a CD copies all the information including CD label, CD type,etc and saves to your hard disk. This becomes useful when you copy a bootable CD in which the settings are configured so the computers can boot from it. Here, I am going to show a software which you can use to clone your CDs, DVDs with all its settings


Step 1: First of all, Download Daemon Tools and install it.

Step 2: After installing it, click on the “Disc imaging” icon as shown in the below screenshot.

Step 3: Now, you will be taken to the configuration dialog box, where you will have to specify from where does the Daemon Tools clone CD, where to save the Clone and whether to password protect it or not.

From the Device Dropdown menu, choose your source CD drive, eg. F:\. Set the reading speed as slow as possible. Because, if you set it too fast, then your destination image file may get corrupted. In the Destination image file, choose the folder where you want to save your clone CD and choose the ISO format. ISO format can be burned with any CD Burner software, so better if you choose it.

After setting up the above settings, click on Start. The software will then start cloning the CD.

I hope you would have gotten idea on how to clone the CD by reading this article !


Related posts:
How to recover MOST of scratched CD data discs.
Secretly Hide Any File Inside JPG Image File
How to mount an ISO image in Windows Vista
Make Mp3 Files Smaller Without Losing Quality
How to safeguard your files when computer crashes

We have already posted lots of articles related to this article, if you wish you can browse them all in the Computer Tricks section.


SIM Data Recovery Software

An Excellent software to recover data for your Sim card,

Sim Card Data Recovery Software recovers your mobile phone sim card accidentally deleted text SMS messages. Data Doctor Sim Card Recovery Software is read only and non-destructive utility restore all lost message. Utility retrieve all deleted contact numbers (phone numbers), unreadable messages, corrupt phone book directory.

It provides full backup of your cell phone's erased sim memory. For recovery, you need a phoenix type USB sim card reader or PC/SC Standards based sim card Reader and a PC having Microsoft windows operating system. Sim card reader scans simcard deeply and detects all the recoverable information. Print option provides the facility to print report of all recovered data like your text message and contact numbers. This software provides full details about sim card like its provider and ICC –ID (identification number). It provides restoration of lost or corrupted text files due to virus infection
in your mobile phone. Recovery is not possible if sim card is locked (due to unauthorized PIN code). Software ensures recovery even if your inbox, outbox, draft and sent items messages and phone numbers are invisible or unreadable. It fetches recently erased call list.


Important:Please remember that you need USB SIM Card reader (any PC/SC Standards or Phoenix Standards based Reader) to use our software to recover data from sim card. If you are not able to find any compatible SIM card reader, Please feel free to contact us to get the information of manufacturers, who can make it available to you in very short time.

Download Link http://www.4shared.com/file/74852469/945dd17/SIMCardDataRecoverySoftwarev3015.html

Hacking Newest Firmware updated phone

Back to our hacking method. you all came to know now that the newest firmwares are preventing our phones to be hacked.

At least, it has with my Nokia N73, and I've heard also with Nokia N93,E51...

After the firmware update, it wasn't possible to establish comunication between TRK application as in Installing Unsigned Application using BiNPDA Secman and famous python script or in any other method!!

Now, all this is possible!

Its all working with S60v3 phones

Here is the complete procedure!!


First, you need to install any file browser, for example xplorer or Y borwser.
Then, download and install HelloCarbide.sisx

Attachment

Start your file browser. Go to C:

Try to access c:\sys

It should fail because don't have permissions. Don't close the browser.

Start HelloCarbide. When you install the application just open it, open Menu1 and answer Yes when prompted (Yes/No) the app will exit.

You're phone has all the caps right now. But there is one problem, you can't open any new applications. So I suggest that you open xplore before running the application and downloading the installserver.exe from this forum before you run this application.

So:

1. Install the hellocabride app
2. Copy installserver.exe to your phone
3. Run X-PLore
4. Switch to the menu and run the hellocabride
5. Press options and chose Menu1
6. Answer Yes (it will be the right soft key)
7. The application will close.
8. Navigate to X-Plore
9. Now copy the installserver.exe to c:\sys\bin (remember to set x-plore to see hidden and system folders/files )

Reboot your mobile!!!

you're done, you can install any unsigned application even with full capabilities from now on BiNPDA Platform Security. You can also turn off/on caps of the Symbian Operating system in the future.

Again Airtel GPRS Hack! Browse Internet For Free


I really don't know whether this trick is working or not, but I found in some forums that members are posting that this trick is still working fine! IF you want to browse internet for free of cost using Airtel Live. All you need to have a free mobile browser Opera 4.2 or 5 Beta 2 and some GPRS setting in Airtel Live

IF your Airtel Live is not active, call the customer care and receive Airtel Live setting and configure according to their guidance.

Now download the following Opera mobile browser and install it in to your mobile.

Now you have have activated your Airtel Live and opera mini browner.

Now change the follow the instruction to configure your Airtel Live setting to surf freely

For s60 users:

Create a new access point and set
Access Point as airtelgprs.com
Proxy address= 80.239.242.253
Port= 80 (Remember its 80 not 8080)

Just try it on your mobile and share your feeback with us.

Reset Your Mobile Memory Card Password 2 minutes


We usually set password for our memory card for privacy and security, but the common mistake every one does at least once in out life time forgetting password. If you set password for mobile memory card, then you should be not forget the password. If you does then the only option is to formate your memory card with the help of the card reader and eventually the loss of all your data stored on it. There is a way to break the security wall. If you are a Symbian device lover then no need to worry about the password. You can crack them in few minutes.


In this tutorial I am going to teach you how to reset your memory card password in easy step. Before we start you need to have X-plore (application used to explore your system files and folder even the hidden folders in your device)


Step1: Install X-Plore in your mobile. If you want to download X-Plore search around internet you can download free trail.

Step2: Open your X-plore apps and Press 0(Zero) and check which you have marked the "show the system files"

Step3: Once you done that now go to the following path C:/Sys/Data/Mmcstore

Step4: Once you reached there you need to press "3" under option to set it in the Hex-viewer

Step5: See the third column you will able to see a line of code ! TMSD02G (c??"?x???6?2?6?2?6). Just check the character between the "?" it is your password ie: 62626


Note: If you have not set the password, then you will not able to gain access to C:/Sys/Data

Trick For Making A USB Recovery Disc For Windows XP

First download Recovery USB Console.
Extract the downloaded "mkrecovery.zip" to your desktop.
Right-click the "mkrecover.cmd" and click edit from the extracted folder.
With notepad, Change the "USBDRV" setting from "R:" to the path of your pendrive location.
Then change the "XPSRC" value to "f:\i386\winnt32.exe," where "F" should be the path of your cd rom drive where windows xp disc is inserted.
And save that file.
Then execute mkrecovery.cmd ( Make sure that you have inserted a valid windows xp disc and you have plugged a usb thumb drive.)
Thats all! You have successfully created a USB Recovery Console Disc for Windows XP.
There are different ways for making a Recovery console disc on usb drive, Here are some other resources which will help to make a usb recovery console disc if the above trick is not working.
* Tutorial on making bootable usb recovery console disc.
* Try the 911cd.net's way.
Also Read:
All Thinks That You Could Do With Windows Media Center

Create A USB Recovery Console Disc For Windows XP

Creating a recovery usb disc will become very useful at critical situations. In this post, I'll explain you on creating a portable usb recovery disc on pendrive for windows xp.

Top 10 SEO Software Free Download Blackhat

1. SEO PowerSuite Enterprise – SEO Software and SEO Tools

SEO PowerSuite is a suite that helps you with every aspect of search engine optimization so that you can boost the search engine performance of your website. This SEO PowerSuite review will give you a detailed description of the features and benefits offered by SEO PowerSuite.


Download Here


2. Magic Submitter 1.32:

Magic Submitter is a brand new Multi function Search engine optimization Submission Software package made by Alexandr Krulik, a well identified world-wide-web marketer that managed to be successful for his previous two well-received software items: Magic Article Rewriter and Magic Article Submitter.Let’s start with, what precisely is Magic Submitter made to do?This software permits you to post articles to article directories, bookmarking all of them, uploading videos and updating RSS feeds with lightning speed.

Download Here

3. Keyword Elite 2.0 – keyword research tool:

Keyword Elite 2.0 is a new keyword research tool developed by Brad Callen. He is a reputed software developer and internet marketer who has previously developed applications like SEO Elite. Keyword Elite 2 is an application that is designed specifically for the PPC and SEO marketers that want to find profitable keywords easily.

Download Here

4. Internet Business Promoter (IBP115) – website promotion software tool:

iBusiness Promoter is a multi-award winning website promotion software tool. IBP helps you in achieving high search engine rankings effectively. It is always up-to-date and helps you optimize your web pages for the latest search engine algorithms. Apart from providing customized tips for on-page optimization, it submits your website to major search engines automatically and monitors your website rank.


Download Here

5. AutoBlog Samurai – 3in1 niche blog creation software suite

AutoBlog Samurai is the latest best autoblogging software today! AutoBlog Samurai is a 3-in-1 blogging software wherein you can automatically create unique contents and post it to your blog with just a click of a button. Not only that, it automatically updates your blog every day without doing anything.


Download Here

6. XGenSEO – SEO social marketing software:

XGenSEO is the next generation SEO Software based on Web 2.0 technology and Social Media and Social Networking. XGenSEO will allow you to dominate the top 10 position on Google, Yahoo! and Bing. The program will build 1000’s of high quality, one way authority links from Social Media and Social Network sites. This powerful new SEO Tool does this by creating accounts on the top Web 2.0 websites and submitting articles with links to your website. This is a top of the line Google SEO tool.

Download Here

7. Sick Submitter 2.14.40– Automated Backlink Builder

With Sick Submitter you get a Forum Profile Submitter, Bookmark Submitter, Directory Submitter, RSS Submitter and Article Submitter all in one easy to use tool.


Download Here


8. A1 Keyword Research 3.2.1 – Website Ranking and Keyword Analyzer

Website Ranking and Keyword Analyzer
Have A1 Keyword Research find, generate and test which keywords have weak competition in searches. Then use our keyword research tool to optimize your websites pages for optimal ranking in search engines

Download Here

9. Market Samurai 0.87.3– Keyword Analysis Research

Market Samurai is an application that resides on your computer (i.e., it is not browser based). It is one of the most complete tools offering keyword research in the areas of market competition, search engine optimization and pay-per-click advertising. The insight into keywords and its competitors are deep and since it is a desktop application, you are able to save your research rather easily. It also comes with other bonus tools for doing article research, social networking research and affiliate resource.

Download Here

10. Article Submitter v2.0 + Crack

Have your article automatic submitted to 500+ article directories in a matter of hours. Receive automatic updates of new launched article directories list.


Download Here

Crack ---Download here

Autoblog Samurai Version Free Download -Blackhat

This software is nothing like you have ever seen before!
Get 'Phenomenal Results' Even If You Are Lazy, Unmotivated Or Have No Time!

Imagine a cutting edge all-in-one software robot that can...

Generate Automatic Income While You Sleep - Auto Blog Samurai Software
'automatically' creates content and updates your blog every day -
once your blog is setup, you're done!

Start Earning Monthly Residual Income On Autopilot - Software seamlessly
integrates with and generates profits from most popular affiliate networks
such as Google Adsense, Amazon Associates, eBay Partner Network & ClickBank.

Get FREE Search Engine Traffic Automatically - Auto Blog Samurai SEO and
keyword optimizes your blogs to receive organic traffic from all major search
engines such as Google, Yahoo & Bing!

Build A Responsive Email List In Record Time - You can in instantly plug your
optin form into the blogs you create with the software and generate a FLOOD
of fresh new buyer email leads!

Truly A 'Set & Forget' Solution - Now building profitable blogs, traffic generation
and building a responsive email list is push button simple!

You may be skeptical at this point...
You should be, after all every hyped product, useless ebook and cluttered video
course out there promise you everything but deliver nothing!

I am sure you are sick and tired of the much hyped product launches that appear
week after week with fancy screenshots and thousands of dollars displayed as proof,
telling you that you can do the same.

Before I move further, let me show you what's possible with Auto Blog Samurai Software
right here, right now - You can achieve this in the next 30 days...

The truth is...
Ebooks, Info products, video training may work or may not work. To get any results you
must sit and watch long boring videos, read through hundreds of pages of ebooks and
spend weeks processing the strategies and tactics you learn. It may take weeks, months
or even years to understand the strategies listed in ebooks, manuals and video courses
and make any money with them!

We all need shortcuts - sounds cheesy, but think about it, we use various shortcuts in our lives
daily such as cars, computers, telephones, cell phones and other technologies that make life easy for us!

Phenomenal results and quick profits can only be achieved through breakthrough tools
and cutting edge automation technologies.

The 'impossible' is now 'possible' - Thanks to a shocking technological software breakthrough...

Download --Click Here

Download the crack software called ABS.rar here... Click Here